Halloween Hairstyles for Women: Enchantingly Glamorous & Delightfully Ghoulish
Halloween offers the perfect opportunity to transform your entire look, starting with your hair. Whether aiming for spine-chilling sophistication or bewitching beauty, the right hairstyle can elevate your costume from basic to breathtaking.

Here’s our curated collection of 25 hairstyles that strike the perfect balance between glamour and gore
Mystical & Magical
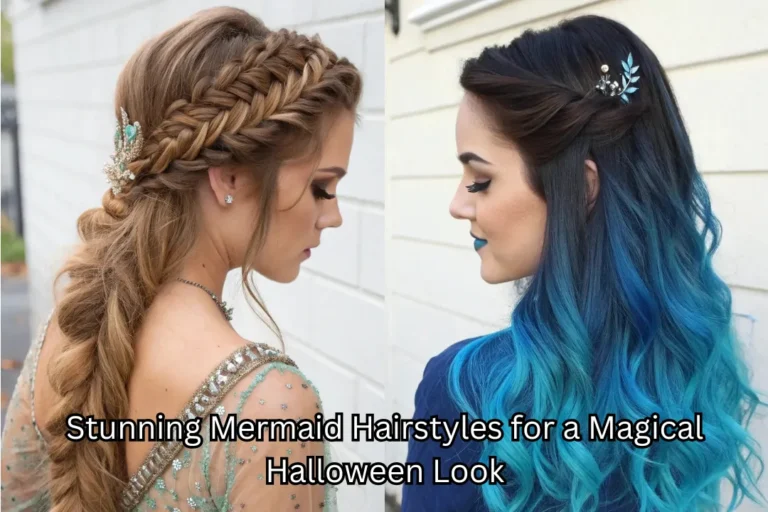
Enchanted Mermaid Waves

Create loose, flowing waves enhanced with temporary aqua-colored spray. Start by using a 1.5-inch curling wand, alternating the direction of curls for natural movement. Brush out with a wide-tooth comb for that oceanic texture.
Add sea salt spray for a gritty texture. Incorporate small seashells, pearls, or starfish clips scattered throughout, securing them with bobby pins wrapped in matching ribbon. For extra magic, dust hair with biodegradable glitter at the roots and ends.
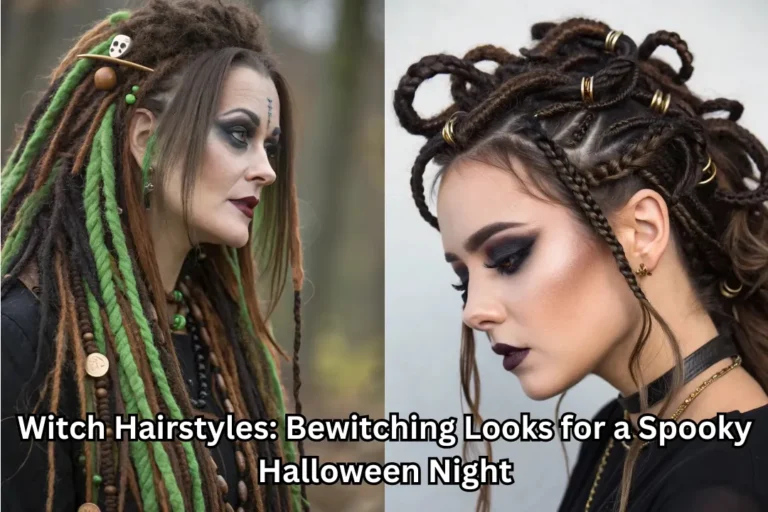
Witch’s Twisted Updo

Form a high, messy bun with strands intentionally escaping. Begin by teasing the crown for height, then gather hair loosely, twisting sections before pinning.
Leave face-framing tendrils and back pieces free for that “just flew in on a broomstick” effect. Weave thin purple or green ribbon through the twists, threading it with a bobby pin with ribbon tied to the eye.
Add a miniature witch hat fascinator tilted to one side, secured with strong clips or hidden combs. For extra dimension, add temporary colored streaks in green or purple to the loose strands.
Celestial Space Princess

Slick back hair with metallic gel (silver or holographic works best), focusing on coating all strands evenly for that wet-look shine. Use a fine-tooth comb to create precise lines if desired.
After the gel sets slightly, add star-shaped clips and moon accessories in metallic finishes, positioning larger pieces at the crown and smaller accents throughout. Optional: incorporate fiber optic hair extensions that light up.
Clip these underneath your natural hair, focusing around the nape and sides for a truly otherworldly glow. Complete with iridescent makeup on the temples and cheekbones to match.
Medusa’s Serpentine Crown

Create a structured updo by dividing hair into three sections – two sides and the back. Form a high, tight bun with the back section as your base. Twist each side section and wrap around the base, pinning securely.
Purchase small rubber snakes (6-10 inches long) from craft or Halloween stores. Insert thin floral wire into each snake for stability, then attach throughout the updo using bobby pins inserted at the head of each snake.
Position some snakes to stand upright around your head like a living crown, others to dangle near your face. For added drama, paint metallic scales on your forehead and temples with makeup.
Fairy Tale Rapunzel

For those with long hair, start with a deep conditioning treatment to maximize shine. For added length, incorporate clip-in or halo extensions matching your hair color (or in fantasy colors like pastel pink or lavender).
Create a basic three-strand braid, loosening sections as you go for a fuller look. Weave thin ivy garlands, small artificial flowers, and butterfly clips throughout the braid, securing with hidden pins.
If you’re going for a twisted “abandoned in the tower” version, add twigs, dried leaves, and fake spiderwebs for a neglected appearance. Consider a small bird’s nest hairpiece with tiny eggs positioned near the crown for storytelling effect.
Glamorously Gothic
Victorian Vampire Curls

Form structured, vintage-inspired curls using a small-barrel curling iron (½-inch works best). First, set hair with hot rollers focused at the crown for maximum volume. After removing rollers, tease the crown heavily, then smooth the surface with a fine brush.
Create a dramatic deep side part using the tail of a comb. Carefully arrange curls to frame one side of the face, pinning others up in a structured arrangement reminiscent of 19th-century portraits.
Add a blood-red velvet ribbon choker that extends up into the hair as an accent, weaving it through several curls before securing. Finish with a strong-hold hairspray with visible sheen.
Crimson Ombré Falls

Begin with clean, straightened hair. Section hair horizontally across the back, starting at the nape. For each section moving upward, begin applying temporary red spray color progressively higher up the shaft, creating a gradual transition from your natural color to intense red at the ends.
Use a diffuser attachment when drying to set the color without disturbing the gradient. Style in loose waves using a 1.5-inch curling wand, alternating direction and leaving ends straight for that just-dipped-in-blood effect.
Perfect for a sophisticated vampire look when paired with pale makeup and dark lip color. Apply a serum to ends to keep them looking wet and freshly blood-soaked throughout the night.
Gothic Cathedral Updo

This architectural masterpiece requires preparation. Start by backcombing the entire head for maximum structure and stability. Create three distinct sections: a pompadour at the front and two side sections.
Twist and pin the pompadour high, creating a pointed arch shape reminiscent of Gothic windows. The side sections should be twisted upward and pinned to create “flying buttresses” that support the central structure.
Use black hairspray for an authentic stone-like appearance. Incorporate black lace pieces cut into architectural shapes, miniature plastic gargoyles from dollhouse supply stores, or bat-shaped pins positioned strategically at structural intersections.
Finish with a heavy coating of maximum-hold hairspray, focusing on maintaining height and dramatic silhouette.
Morticia’s Midnight Cascade

Begin with freshly washed hair and an intense conditioning treatment for maximum shine. Create a precise middle part using the tail of a comb, ensuring it’s completely straight from forehead to crown.
Apply heat protectant liberally before straightening small sections with a professional-grade flat iron at medium heat. Work methodically from nape to crown.
For added length and density, consider sew-in or tape extensions in jet black. Add temporary black hair dye or use a high-quality black wig with a lace front for a natural hairline if your natural hair isn’t dark enough.
Finish with a shine serum applied from mid-length to ends, avoiding the roots. Keep shoulders back and neck elongated when displaying this dramatic style, channeling Morticia’s elegant posture.
Bride of Frankenstein

This iconic look requires significant backcombing and structure. Begin by dividing hair into three sections: two side sections (where the white streaks will go) and the middle section for the beehive.
Backcomb the middle section aggressively, working from ends to roots in downward motions. Shape into a conical beehive structure, smoothing only the outer layer and pinning securely.
For the signature white streaks, apply temporary white color spray or clip-in white hair extensions on both sides, combing upward to blend with the beehive. Secure with a strong-hold hairspray.
Modern interpretation: Add metallic “bolts” as hair accessories on either side of the neck, using industrial-looking metal hair clips or modified costume jewelry. Complete with dramatic black eyeliner and stitched scar makeup across the forehead or neck.
Creepy & Crawly
Spider’s Web Half-Updo

Begin with textured, wavy hair (use sea salt spray if needed for texture). Section off the top half of your hair from ear to ear across the crown. Divide this top section into 6-8 smaller sections radiating from a central point at the crown. Using clear elastic bands, connect these sections in concentric circles, creating a web pattern.
Place the first band about 1 inch from the center point, the next 1 inch below that, and so on, forming a spiral web. Secure the entire structure with bobby pins at the central point. Attach small plastic spiders throughout the web using hair-safe glue or by gluing spiders to bobby pins.
For added impact, apply a temporary black color to the “web” sections while leaving the loose bottom hair as your natural color. Finish with a light-hold hairspray that won’t disturb the delicate structure.
Zombie Decay Textured Waves

Start by not washing your hair for a day to build natural oils. Apply dry shampoo at the roots for additional texture and grit. Tease hair aggressively, section by section, focusing on creating uneven volume all over the head. Use a teasing comb at the roots, working in different directions for maximum chaos.
Apply temporary green or gray spray color, focusing on the roots and mid-lengths, leaving some ends their natural color for that decayed, patchy effect. Use a texturizing spray generously throughout.
For an authentic zombie appearance, consider safe theatrical makeup “wounds” at the hairline – create using liquid latex and stage makeup, or purchase ready-made prosthetics.
Add small leaves, twigs, or debris randomly throughout for that “just rose from the grave” authenticity. Pair with ashen makeup and dark under-eye circles.
Possessed Pigtails

Create high, messy pigtails with intentionally uneven placement and jagged parts. Begin by roughly parting hair down the middle with fingers rather than a comb for that disheveled look. Secure each pigtail with clear elastics wrapped multiple times for security. Pull strands out randomly to create escaped tendrils around the face and nape.
For the possessed effect, add 8-10 pieces of thin fishing line or invisible wire (approximately 8-12 inches long) to each pigtail, securing at the base with bobby pins. Attach small weights to the ends of the wire (tiny paper clips work well) to help them “float” more naturally.
Apply temporary color spray in faded blue or gray tones for a ghostly appearance. Complete with pale makeup and dark circles under the eyes for that “not slept in centuries” look.
The Conjured Braids

Create approximately 8-10 thin braids distributed randomly throughout the hair. For each braid, insert a piece of thin, bendable wire (floral wire works well) along with the strands before braiding.
The wire should be slightly longer than the braid itself. Secure ends with clear elastics, leaving the extra wire exposed. Once all braids are complete, use the protruding wire to shape each braid into unnatural positions, having them curve upward, sideways, or in spirals, defying gravity as if controlled by supernatural forces.
For added effect, wrap some braids in colored thread or add small charms like tiny bells, feathers, or bone-shaped beads to the ends. Apply a glowing temporary hair color to the braids for an ethereal effect. Style remaining hair in loose waves for contrast against the structured, floating braids.
Hollywood Inspired
Harley Quinn Split Dye

Begin by creating a precise middle part from forehead to nape. Clip one side securely away while working on the other. Apply temporary pink hair color spray to one side, working in thin layers and allowing each to dry before adding more for vibrant coverage. Protect the part line with a piece of cardboard placed along the part while spraying.
Repeat with blue temporary color on the opposite side. Once dry, create high pigtails positioned slightly asymmetrically – the pink side slightly higher than the blue for Harley’s chaotic aesthetic. Secure with color-coordinated elastics (blue on blue side, pink on pink side). Add texture by curling the pigtails with a 1-inch iron, focusing on the ends for that slightly frayed look.
Complete with Harley’s signature makeup: white face, black mask around eyes, and bright red or black lipstick. For extra authenticity, add temporary tattoos on the face reading “ROTTEN” or “Daddy’s Lil Monster.”
Corpse Bride Blue Waves

Start with freshly washed hair. Apply a heat protectant before blow-drying straight. Use temporary blue hair color spray all over, focusing on even application. For authentic Corpse Bride coloring, choose a pastel blue with slight gray undertones.
After the color is dry, create romantic, flowing waves using a 1.5-inch curling iron, alternating the direction of curls. Spray each section with flexible-hold hairspray before curling.
Add a small, tattered white veil attached to a hair comb or bobby pins, positioning it slightly off-center on the back of the head. Enhance with dead or dried flowers around the veil’s attachment point.
For makeup, create a hollow-eyed look with deep-set blue-gray shadows and pale blue-tinted foundation. Consider drawing subtle stitch lines on the neck or arms using blue eyeliner for the full corpse effect.
Maleficent’s Horned Crown

Begin with clean, dry hair. Apply strong gel throughout and sleek the hair back tightly against the scalp, eliminating all bumps and flyaways.
Gather at the nape into a tight, low bun secured with strong elastics and bobby pins. For the signature horns, you have two options: purchase Maleficent horn accessories that attach with combs, or create them yourself.
For DIY horns, wrap black foam around wire frames, then cover with black fabric or electrical tape for shine. Secure horns to the head using a headband base with strong combs on either side. Use additional bobby pins around the base for security. Draw a precise widow’s peak at the hairline using black eyeliner or a temporary tattoo marker.
Apply deep purple or black eyeshadow at the temples to create hollowed cheekbones. Complete with Maleficent’s signature green-tinted highlighting powder along the cheekbones and bold red lip.
Wednesday Addams Braids

Begin by applying a smoothing serum to damp hair. Create a severe middle part using the tail of a metal comb, ensuring it’s perfectly straight from forehead to nape. Divide hair into two equal sections.
For each section, create a tight three-strand braid starting at the nape and working downward. Secure ends with clear elastics. For the modern twist, add a thin black ribbon by attaching it at the start of each braid and weaving it through as a fourth strand.
Alternatively, add tiny skull accessories at the ends by threading them onto the elastics or gluing them to small clips. To achieve Wednesday’s signature severe look, apply smoothing product to any baby hairs or flyaways at the hairline and temples.
Complete with pale powder foundation, dark burgundy-brown lipstick, and minimal eye makeup for authentic Wednesday Addams pallor. Aim for braids that hang perfectly straight down, not angled outward.
Cruella’s Dual-Tone Statement

This iconic look requires precision. Start by applying a deep conditioning treatment to ensure hair can withstand temporary coloring. Create a dramatic side part using the tail of a comb, placing it approximately 2-3 inches from the center.
Section off hair precisely along this part, securing the smaller section away with clips. Apply white temporary color spray to the smaller section, working in light layers and allowing each to dry before adding more. For the black section (or keeping natural dark hair), apply a shine serum for contrast against the matte white side.
Style in a vintage-inspired wavy bob using a 1-inch curling iron, creating uniform S-waves reminiscent of 1950s Hollywood. Set each wave with pin curls while cooling for definition. Brush out gently once cool for that signature sculpted wave pattern.
Complete with Cruella’s dramatic makeup: bold black eyeliner with extended wings, bright red lipstick, and defined brows. Consider adding a fake cigarette holder as a prop accessory.
Quick & Easy
Pumpkin Spice Space Buns

Begin with clean, dry hair and apply texturizing spray throughout. Create a clean middle part from forehead to nape. Divide hair into two equal sections.
Apply a temporary orange color spray to each section, focusing on even application and building color gradually. Twist each section from roots to ends, then wrap around itself to create a bun positioned high on the head (near the crown).
Secure with bobby pins inserted in different directions for stability. Leave out small sections near the face for baby hairs. Using edge control or styling gel, create spiral “vines” with these baby hairs around the forehead and temples.
Cut small strips of green ribbon approximately 2 inches long. Fold each ribbon in half and secure at the top of each bun with a bobby pin, allowing ends to stick up like pumpkin stems. Add minimal gold glitter to the buns for festive sparkle. Complete with autumn-inspired makeup featuring warm copper and bronze tones.
Bloody Mary Slick-Back

Start with freshly washed hair. While still damp, apply generous amounts of wet-look gel from roots to ends, combing through with a fine-tooth comb for even distribution. Create a precise center part using the tail of a comb.
For the blood drip effect, mix red temporary hair color with additional clear hair gel for a translucent, liquid appearance.
Using a small makeup brush or the end of a rat-tail comb, apply the red mixture along the part line. Create intentional drips by applying thicker amounts that will naturally drip downward.
Guide these drips with the brush to control direction and length. Allow to partially set, then use a blow dryer on the cool setting to speed drying without disturbing the drips
. For added authenticity, apply similar “blood” drips at the temples or hairline. Complete with pale foundation, dark under-eye circles, and blood-red lipstick slightly smeared at corners for the full Bloody Mary effect.
This style works with any hair length but is most dramatic on shoulder-length or longer hair.
Ghost Girl Platinum Waves

Begin with clean, dry hair. Apply heat protectant before styling. For an all-over white effect, use a temporary white hair color spray, working in thin layers from roots to ends. Allow each layer to dry before adding more until you achieve an opaque white appearance.
For platinum blonde hair, enhance with white powder dry shampoo instead. Once color is set, create long, flowing waves using a 1.5-inch curling wand, alternating direction of curls for natural movement.
Focus on creating loose, ethereal waves rather than defined curls. Cut strips of sheer white fabric (like organza or chiffon) approximately 10-12 inches long and 1-2 inches wide.
Attach strips to bobby pins, then secure throughout the hair, positioning them so they appear to float among the waves.
Apply dramatically pale makeup with slight gray or blue undertones. Add subtle shimmering highlight powder on high points of the face for an ethereal glow. Create hollowed eyes using gray and purple shadows blended outward.
This Halloween, let your imagination run wild as you conjure up the perfect hairstyle to complement your costume. Whether you’re channeling glamorous gore or mystical magic, these 23 options offer something for every ghoul and goddess ready to make a statement on the spookiest night of the year.
